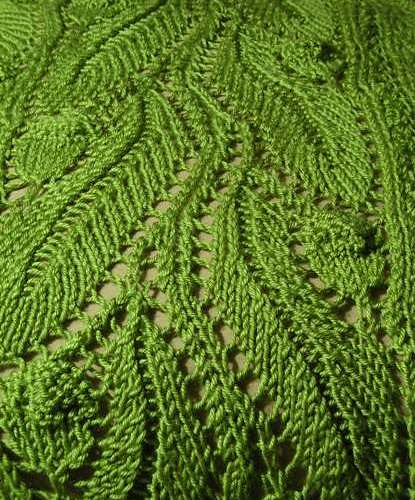
Tuesday, December 6, 2011

Native Crafters Ravelry Group

Much to my surprise and delight,

I've joined the moderating team on the Native Crafters group on Ravelry.


This group is pretty small for the moment, it's coughed and sputtered for a while, but I really hope we can breathe new life into the group. We're doing a SAL (spin-a-long) after Christmas and I'm so looking forward to it! By the way, you don't have to be Native to join the group, everyone's welcome and more the merrier.

I met a very talented spinner on there today, she just joined and her handspun knits are absolutely gorgeous! And yes, she spins her own 2ply lace-weight and she's an ace at Navajo plying! I'm so going to enjoy this SAL - I can't wait to see the braids she's chosen spun up.

Here's what I'm going to spin, it's a Merino/Nylon sock kit I got from Smith and Ewe. Isn't it pretty? Just take my word for it that's it's much prettier in person.


It's so hard to get the colours right in the pictures, it's more light to dark mauve/purple with a small amount of blue. The picture shows a little more red than there should be.


Here's what the package says:


"Handspinners Pair of Socks
The 80% Merino/ 20% Nylon superwash rovings have been handpainted,
then split in half to form 2 balls of roving to spin yarn for 2 socks. 125g

It's a novel fibre presentation to me, I've never seen these sock kits before - her prices are definitely reasonable and she shipped really fast, I'll buy from her again!
She's based out of Kamloops, BC.

For the SAL my challenge is: spin Navajo plied fingering weight sock yarn.... ya.... (we'll see, this goal could surreptitiously change!) Come on over to the Native Crafters group and you'll see it all go down! Come and join us and show me how it's really done ;D


Friday, December 2, 2011

*NEW* Toxic sock design first.....then Casting ON


Ta daaa... my new socks! Flames... skull & crossbones... test knitting is complete and the pattern is released! It's top-down, in-the-round flaming stranded fun to do - and it's simpler than you think!

I named them TOXIC firstly since hubby came up with the idea and I liked it and also because if you did the flames green instead of red or flame colour, the flames could be smoke! After all, anyone's feet with green smoke coming off them and a skull & crossbones clearly displayed... obviously has toxic feet.

These socks come in 3 sizes (small, medium & large) and you can choose from 3 different toe patterns. The toe is 'semi-round', as is the heel.

Toe notes:
  • The sample has flaming toes and a striped sole all the way to the end. The pattern has a fun 'cut'n tape toe chart that you can place anywhere on the instep chart to get any length sock you need.

  • But the pattern has a chart to do a striped toe as well. One of my testers did the striped toe and it goes well visually with the heel and gusset.

  • You could also do a plain toe. If you do, I suggest doing the plain toe in the contrast colour (flame colour) and maybe the heel flap too. These choices are all available on the pattern.


I just casted on another pair, this time for my son. Here's a pic of him at work. I thought since he's a firefighter he'd appreciate some flaming socks.

I worry about him when he goes out on calls in all weather and road conditions. I want him to have some squishy soft and warm socks made by mommy, so I ordered some merino superwash to make him some.


OK, onto
PART 2!
Casting on Socks

I love starting new projects! I'm MOTIVATED! I'm SURE the project is going to turn out GREAT! I can't wait to FINISH! ...and I DON'T like being discouraged by uncooperative cast-ons! Read on for my

comedy of errors casting on...

Don't you hate it when:

...you do a stretchy knotted cast on (which takes soooo long)
[because you want to just start knitting and you don't want to have to worry
about not having a long enough 'tail' to finish a long tail cast on]
...then you get out the rest of your dpns and get ready to join in the round...
...and the needles are flopping around making yarn-overs over the ends of the needles and
it's hard to make sure the work isn't twisted which is really fun with black yarn in dim light ...
...then when you start knitting, the first round is so paaaainfully slooooow...
and you're trying to **JAM** the needles into a tight knotted stitch
and the other stitches are spreading further and further apart
so long droopy loops are forming between the casted on stitches...

(arghhhhhh!... expletive... )

Anyway, that's what happens to me.


So I want to tell you about my fave cast on method!


I know a lot of people really like the knotted cast on but (for me) I find the German Twisted knit & purl cast on works the best for me. Why?

  • I find it much faster to cast on since it's a variation of a long tail cast on.
  • I like the finished look better, because even the cast on stitches are either knit or purl so it streamlines the look of the cuff.
  • It's just as stretchy.
  • It has a more substantial edge, so I don't have to fight floppy needles when I'm trying to join and do the first round.
  • The stitches seem more 'stable' to me because the first round is easier for me to work and isn't as slow so I can proceed with my project with that 'new project' smile still on my face.
Remember, that's just my personal opinion and everyone has their own tastes and methods that work for them. Maybe I prefer this cast on because I'm a 'picker' rather than a 'thrower'? I don't know?

So if you want to make some socks
and try the German Twisted knit & purl cast on,
you can watch a VIDEO on how to do it HERE


If you want to cast on Toxic and knit along with the video,
here's an estimation for how long your tail should be when you start.

For fingering weight and 2mm/US0 needles, multiply the total number of cast on stitches by .63 to find out how many inches your tail should be to start with.

(If you're using larger needles like 2.5mm/US1, you'll have to go up a bit eg: to .65 - .7 )

For small (70sts) 45" / 115cm
medium (80sts) 50" / 128cm
large (90sts) 57" / 145cm

Following this formula, you shouldn't run out of tail before your cast on is done - and you should still be smiling =D

Let's cast on!

Monday, November 28, 2011

Creamsicle Romney


Fun with koolaid dyeing :D

This is Fine Romney I got from Joybilee Farm, and I dyed it using koolaid. Did you know that tropical punch and cherry are actually the same colour? The cherry is just a little darker. Live and learn... I used tropical punch, cherry and orange for this.


I dyed the locks then blended by hand carding some of each along with white. After I made the rolags, I pulled the end of the rolag to draft each one out lengthwise to make bumps.


And here it is 2-plied, it's about a sport weight and 450.5 yds.

I think they want to be fingerless gloves...


Sunday, November 27, 2011

What?! Resolution time AGAIN!?

How did I measure up in meeting my resolution goals last year? Not tooooo bad...

1st was to work on my spinning skills. I'd call this one a success! I'm building up my spinning supplies/equipment too.
  1. I now have a drum carder and I'll just have to post pics (later)of it because it's 78 years old and it's still going strong.
  2. I have a spinner's gauge from vipfibers.com, just last week actually, so I haven't tried it yet.
  3. I spun up almost half a full fleece to make a sweater for hubby and it's coming up a nice dk weight. I think I'm going to double it for a 4ply bulky though.
  4. I ordered some merino/nylon fibre to try my hand at 2ply fingering weight so I have to see how that goes once it gets here. I ordered that from SmithandEwe on Etsy, a shop out of Kamloops, BC.
  5. Hubby made me some hand combs that work great - I'll have to get pics up of those too!
  6. I have plans for a home made picker.
  7. Still not accomplished: I have to find some Llama or Alpaca fibre to blend with wool to make my son a sweater! The farm down the street from me is out of stock and I haven't been able to find any raw or carded that takes paypal :(
My second resolution was to get the website up. SUCCESS! It's (surprise surprise...) http://www.skukumknits.com . Only one problem with the site, when you make a purchase the confirmation email you get isn't set up properly so... you end up with a long text of programming language. In there amongst the computer-speak is the link to download the purchased pattern.

I haven't the foggiest idea how to fix it. I've posted for help on the 'opencart' site, (opencart is the software used for my site) but so far no-one's been able to help me out. My apologies that this confirmation email is so unprofessional but I'm not a professional coder so it's a steep learning curve LOL.

My third resolution was to design more. I didn't quite meet my goal but there are some more designs. I'm finding the more I design, the more unique I'm demanding they become so it's taking longer. I also find the test-knitting step takes a very long time. It isn't just me that test knits, but as many as 15 people test each design for accuracy and clarity.

MY NEW RESOLUTIONS:

  1. Design MORE
  2. Fix my website confirmation emails
  3. Spin llama/alpaca & wool for my son's sweater! (I have to find the fibre first)
  4. Learn to spin fingering weight sock yarn
  5. oh yes... and keep my blog up to date LOL (my ravelry friend sproutsnknits has challenged me to post regularly - thank you, I'll do my best :D )
Stay tuned, I'll share some pictures in my next posts... happy spitting (spinning & knitting all in one?) gooooaaaaaannnn that was a bad one.

Wednesday, January 26, 2011

Publish or ePublish?

I have a mitten pattern that's currently being tested and it's going great. It actually feels more like a KAL than a test which I really like. The testing is nearing completion and now I have a question... the WAY I should release the pattern.

Only thing, is I have another motif charted for these mitts. Should I test the motif in a separate test and publish two different patterns, or merge the patterns?

There is also a matching double knitted snowboarder hat boasting these two motifs. My thought is maybe publish two hat and mitten sets.

My real wish is to hang on to these patterns, then release them as a downloadable ebook. I would LOVE to have these for sale both on my site (if it ever gets up and running) and possibly Amazon. I would have to research that possibility to find out what's involved.

My rav & yahoo friend Kelly Klem is a published designer working on publishing her first hard cover book. I'm so happy for her and I know she'll do very well, she's a talented designer! But for me... I know there's a lot of information out there but also a lot of costs involved depending on how you choose to publish. That's one reason I don't think my first 'book' will be hardcover.

How about selling my patterns from this 'Legend Series' as a book for Kindle users? Now that idea I'm really interested in!

There's a lot of research to do. I can do that as I add to the 'Legend Series' patterns, work on layout, editing, testing, cover design, sample production and the photoshoots. I'm sure I missed something lol.

Monday, January 10, 2011

Resolutions

Lose weight?...nope

try to be nice?... nope, I'm already nice he he

cut down on coffee?... not a chance

I don't usually make resolutions, but I do like to set goals for myself and take on new challenges.
For this year, I want to achieve three things.

First thing, will be to hone my spinning skills and I have a couple of wool fleeces here to do that with – yah!

Next thing, is to get my website up and running. I have the domain, but nothing's on it yet L It'll be an exercise in motivation learning what all is involved with that too.

Lastly, I want to do a whole lot more designing. I've only been releasing one pattern every two months... I want to try to double that this year. Actually, I also released a free pattern called Radial Heat Cowl! So, I did a little better than one every two months. I hope I'm not jinxing myself by setting that goal, and I want to do my best to not let myself down.

I have a couple of designs waiting to be written into proper format, then the testing has to be done. The editing and testing take quite a bit of time. My current design is being tested by a lovely group of ladies and I can't wait to see their results!

In 2010 designs released were the Voyageur hat, Whispering Wings, then Lush Lace Stole. The lush hat followed that, then the Chele Lace Hat & Scarf set. The last one was the Spirit Mobius... and let's not forget the cowl.


Monday, December 27, 2010

Holidays & a FREE COWL PATTERN!

What a busy Christmas... I didn't even go anywhere! lol

I had knitted gifts that had to go places though, and not enough time it seemed to knit them leasurely. I'm quite happy to say, I finished them ALL! AND they arrived at their destinations in the nick of time :D
The funnest present I made has to be the monster pants. The giftee is only 14 months old, so the pants are more for the entertainment of his parents but they were fun to make and turned out way too cute! Check out the eyebrows lol. Incidentally, the face is on the back of the pants...


The next best on my Christmas gift list was the 'Radial Heat Cowl' I designed for my daughter in law Trish. It is sooo soft and stretchy, it's made with Stitch Nation Merino wool & alpaca, and I added a strand of Sirdar Blur Mohair for a little warm fuzz.
This pattern is FREE (click the link) folks... and it includes directions for kitchener grafting in 2x2 rib as an added bonus.


Sunday, September 26, 2010

More Lacy Leaves - Wahoo!

I've been working on a new scarf pattern, which is all ready for testing now as soon as I get this prototype knitted up. I started it yesterday and I'm finished half of it already so it's knitting up quick. I spent most of yesterday writing up the pattern actually!


It's called 'Chele Leaf Lace scarf' and I named it after my good friend Michele. She really liked the leaf edging on the Lush Lace Stole and requested a scarf using that edging... so here you go Michele!

We all go through hard times in our varied lives, so this scarf is knitted in two pieces starting from either end, with brambles. There are 7 rows of brambles, and into and out of these brambles, life and growth still miraculously occurs. Large leaves overlap and grow up out from the brambles, while smaller leaves grow down into the brambles.

It's too bad my picture-taking can't show you how pretty this scarf really is... I want a hat and arm-warmers to match. They're only designed in my head so far - give me a few days though :)

Friday, July 30, 2010

Leaf & Acorn Intoxication?

I've been playing with the leaf & acorn pattern again and came up with a toque!
Funny, I don't seem to get bored with this pattern, maybe because the lace pattern seems to 'move' and it isn't the same 4 or 5 row repeat that's memorized the first go round, then by the 10th your almost asleep (at least I am).

This is just a prototype and the only existing pattern consists of a bunch of scribblings and taped-together charts lol. I want to add some tweeks like a fold-up brim, but I'm pretty happy with the short-row shaping.

It's knit sideways too (a first for me) then grafted to join, although it could be just seamed if grafting isn't for you. I used smaller needles for this for a denser pattern, 4.5mm/7us as opposed to the 6mm/10us I used for the stole.
Speaking of the stole!....
The "Lush" lace stole pattern is now fully tested and available for sale on Ravelry now - yay! I was both thrilled and amazed when the "All Weights Lace" group announced they've chosen "Lush" for a knit-a-long to begin Sept 1!
My testers were the best and their finished stole pictures are up too. It's so fun to see the different yarns and colours they chose and they're all gorgeous!
They're in the process of linking their projects to the pattern page now. Here's a link to the pattern page http://www.ravelry.com/patterns/library/lush-lace-stole-with-leaves--acorns and on the right hand side you'll see the box titled "About this pattern"... in there it will say x number of projects. Click on that to see their pictures.

Sunday, June 27, 2010

Another Lace Shawl Design


I started this design in April and finished it completely - pattern and all on June 24. It's being test knitted now on Ravelry - yay! It's called "Lush" for the big green leaves, acorns and smaller leaves making up the border.


Here's a close up of the stitch pattern - my favorite is the viny branch that winds it's way up the pattern.


I used acrylic to make it, since I was designing and experimenting with different methods of decreasing and increasing and tweeking the shape. I had to undo/redo lots and don't like to put that much stress on nicer yarn.

So I used Red Heart soft touch which is a light worsted - I'd call it DK and it has a great sheen to it which really shows off the pattern. After washing it was so soft and drapey! I'm surprised how well the Red Heart did. And it's so light too!

It's 5'8" long and 21" wide unstretched. In a natural fiber, stretched a little it could be huge!
hmmm what should I work on next? I'm considering a cardigan in this stitch pattern... we'll see.

Thursday, June 3, 2010

Spinning from Roving

I decided to put my teasing and carding of raw fleece aside for the moment and try spinning from a prepared dyed roving and what a difference!

Pictured below from left to right:


Pencil, 3ply, 2ply, loftier 2ply, drafted roving


So for a newby like me to get finer consistant yarns, consistant finely drafted roving is almost vital. So there you go newbies like me... you CAN do it.

When the roving is drafted out this fine, it practically spins itself - no kidding! I don't even know what weights these would be. The loftier 2ply is about a baby weight and is spun at about 7 twists per inch. This means I treadle twice for each 2 1/2 inch section on my wheel that works at 6 1/2 twists per wheel revolution. I hope that makes sense. The higher twist 2ply is obviously finer than the baby weight

Sorry I used black to illustrate this, but it's what I had. :D

Doin' the happy dance..... de de de deeee

Thursday, May 27, 2010

OOPS another foible

Lesson for today: don't store washed fleece in plastic bags.

I've been spending far more time carding these days than I have actually spinning which may or may not be normal when preparing your own fleece. But imagine my surprise when my longest locks which I kept in a big plastic bag just seemed to disintigrate in my hands as I teased them apart! How heartbreaking is that?!

A few of them that still had a bit of lanonin in them were ok and I got to discover how fun the long draw is! I LOVE IT! It seemed so easy! It was a little more difficult with 'drier' fleece though. I wonder why that is?

I spun what I had carded (didn't take too long) then decided to work on my next shawl design. I was swatching away quite happily experimenting with different decreases for my "oak leaf & acorn" stitch pattern. Well the acorn turned out great - but there was just something wrong with the oak leaf. Somehow, experimenting with the decreases I guess, I couldn't believe my eyes... it looked like... ... a penis! (can I say that on here?) How could that be!?

and sitting next to the acorn clinched it. Well I never laughed so hard in my life! I can't make a shawl with those on it... I wanted to represent a mighty tree, not a manly one! My DH is still shaking his head. Oh well, back to the drawing board! (I'll spare you the picture) :)

Tuesday, May 18, 2010

Skeins of Yarn!

I know it's not perfect, but I'm completely charmed by the magic of spinning yarn on my wheel.


I got a lot of valuable tips from other spinners and have learned a lot. Mostly that trying to spin fleece that's full of slubs is not the best to learn with! I had to pick them out as I went along and yes, quite a few got by me and got plied in with the finished yarn.

I found out that they can be combed out before spinning, and I'm going to try carding some then combing it. I'm almost through the batch of fleece I carded and drafted out ahead of time.

Plying the yarn took courage on my own here, but again I got tips from experienced spinners (yay!) and I credit them with the yarn I ended up with as a newby spinner. The single yarn is spun with a Z-twist, which means spinning the wheel clockwise. This yarn will have extra energy in this twist and will try to ply back on itself if you release tension on it.

Because of this, if you tried to knit with this unplied yarn as is, your knitting project would be skewed. This excess twist can be used to your advantage in plying.

To ply, two ends of your single yarns are attached to the leader and this time, turn the wheel counter-clockwise. This will ply the yarn, and depending on how many times you treadle it will release this excess Z-twist and 'balance' the yarn. Voila!

Here are the first skeins from my spinning wheel


They aren't perfect skeins but I'm absolutely thrilled! I was aiming for a sport weight and that's mostly what I have. You can see some thicker parts and slubs that got past me but I look at it this way... I'll probably never be able to make yarn this way again - right? It should make some funky hats and things and I do plan to dye these too. I just have to find out how. For now, I'm happily practicing away, totally hooked now making a few more singles for plying just like these ones.

Thursday, April 29, 2010

Ashford Traditional spinning wheel

My spinning wheel is finally here - YAY!!!!!


It seemed none the worse for wear after being stored for these long months while we moved. I oiled it and started it up. I believe it's an Ashford Traditional wheel but I'm not sure since I bought it used and it has no markings or labels of any kind.

I do have one small problem though.


See the nut and bolt from the footman rod to the hub bar? As I spin, this tightens and makes it harder to treadle. I loosen it by hand every few minutes and that really shouldn't be a big deal, but it's beginning to bug me.

Has anyone seen this problem before and know how to fix it? I might get my DH to file off the threads on part of the bolt... the inside of the hub bar is threaded but I don't think the bolts threads should be that long. I think just the end of the bolt should be threaded to hold on the nut... right?

Oh I feel bad about complaining I'm so happy to finally be able to start spinning - you have no idea! :D

I find using the wheel soooo much easier too. I felt very clumsy using the hand spindle and couldn't get past the 'park'n draft' method so it was really slow. The spinning wheel feels comfortable and I don't need to stop and start so it's a lot smoother. (except to loosen the hub bolt) So my yarn is coming out a lot smoother and I'm absolutely thrilled!!!

I'm practicing happily and I don't think it'll take too long before my consistency is better [I hope] , my thin/thick parts don't seem too bad at all any more. I'm just going to keep practicing, I don't even want to think about the plying yet - that scares me. Hopefully I'll find some local help to learn how to do that properly.

Wednesday, March 17, 2010

My boat anchor

What a gorgeous day today! I went to our tiny little library to try to find a book or two on preparing raw fleece and spinning. They don't have any but ordered a couple of selections through inter-library loans. Patience is a virtue, right?


Well over the last couple of days, I've been playing with my new little boat anchor (Ashford spindle) and was quite pleased with my progress! Hey - I can now make my very own novelty yarn! LOL


Of course there's lots of room for improvement AND I'm not the quickest spinner on the planet - heck, I don't classify myself as a spinner yet! I don't think it happens in just a couple of short sessions for a couple of days. I'm determined though, I'm going to keep trying.

My very FIRST spinning was done a few days ago and it's the banner picture for my blog. I decided to just jump into the fire and try 3-plying. *WELL* No guts-no glory right? Well, I had the guts, but the "glory" didn't quite manifest itself.

I laughed so hard when I saw the result - I just HAD to save it.


Yes, I even set the twist... so I'm keeping this tiny skein as a measure of my future progress.


It looks better coiled up eh? he he he

Saturday, March 13, 2010

Cleaning fleece isn't as easy as I anticipated.

I've tried two different methods and here's what happened.


As soon as I got my fleece, I took out half a dozen locks and washed them individually in the bathroom sink. I followed instructions given to me by Chris at Joybilee farms and filled the sink with hot water and Ivory dishwashing liquid. She actually told me to use Dawn, but Ivory's what I have and I had to try. She also said to gently rub the tips on a bar of soap - no problem, I just happen to make all our own soap. I soaked the locks for only a minute, dragged the tips over the soap, and soaked another minute. I then rinsed them by dipping into fresh not-quite-as-hot water.


Worked pretty good, but the tips are slightly stained yet.

Next experiment, I got a plastic mesh basket thing and put quite a few locks in it. I filled the sink with hot tap water (it was too hot for my tender fingers) and Ivory soap. Well, I've changed the soapy water over and over, I even let it soak all night and the result is not as good as washing the locks individually.


The lock on the left is still yucky dirty, the center lock has been washed repeatedly as a batch, and the one on the right was washed individually. So far washing individual locks wins.

I don't want to be condemned to standing at the sink washing individual locks for days! My 1.4 kg of fleece works out to 3.08 lbs which translates into too many locks to wash this way.

I started searching to see what I could find online, and came across the Yarn Harlot's blog where she descibes how she does it. Here's a link http://www.yarnharlot.ca/blog/archives/2007/08/28/this_is_the_way_we_wash_our_fleece.html


I just might give her method a try. I'm absolutely paranoid of ruining my fleece and I'm being sooo gentle with it! Anyway, she get's a roasting pan and lays a clean pillow case in it. She then stacks her locks all neatly in two rows on the pillow case and then folds the pillow case over the fleece, making a big sausage shape package. I don't have her method memorized so if you're inclined get the instructions straight from her site. Basically, she puts her fleece package in soapy water on the stove and turns the heat on low. She doesn't use Dawn, she uses bargain blue-coloured dish soap, so I thought using Ivory would have been ok. I have to print out her instructions and try it.

Has anyone had the tips of their fleece stubbornly remain slightly amber coloured? I have to say, it smells a lot better now though. I'd love to hear some comments.

A knitter's Obsession

It all started like this.

Christmas was coming and I was knitting gifts. You know how it is - one boring hat after another. I needed something more.

I google-cruised looking for innovative new ideas and discovered Cat Bourdhi and how to knit a Mobius. Great! I made a few of those (all different) and this kept me entertained for a while. Then I stumbled onto "double knitting". I even found a Yahoo group and joined. This, inspired me but I couldn't find any double knitting patterns - so always ready to take on a new challenge, I came up with my own pattern. I came up with a few charts too. My obsession was being fed for now and I was satisfied. My gifts were all gratefully recieved.


Still feeling the itch, I felt compelled to knit lace. I knitted a lace shawl, although it turned out great, there was something missing. I needed to design my own lace. In the meantime, I also joined a dynamic lace knitting group called "Mario knits". Talk about inspiration!

I really wanted to come up with my own design... so I got out the stitch dictionary and got started. I can't leave a stitch well-enough alone, so I modified everything. My first test knit was done with Phentex acrylic yarn. Hey - blocking was sure easy... throw it in the washer, then into the dryer... voila! Blocked! You know, I'm an equal opportunity yarn lover - I love all types of yarn but my lace masterpiece needs to be made from an organic fibre for a couple of reasons.

Firstly, my shawl was taking me deeper into the traditions of knitting, so the yarn should be more traditional too.

Secondly, it had to reflect somewhat on my heritage - be a part of me.


I happen to be First Nations and wanted my creation to contain organic subject matter and also be made of organic materials.

My chosen subject matter was flight and honoring the creatures that fly.
My shawl was born and I named it "Whispering Wings".

For anyone interested, it's now posted on Ravelry here... http://www.ravelry.com/patterns/library/whispering-wings or you can go to my patterns for sale page (top right of this screen) and get it there too without going to Ravelry and signing up. Anyways....


Now my quest was choosing a fibre. Google-cruising again, I looked at a lot of yarn sites and their prices were pretty good but shipping was expensive and I'd have to wait for it to be delivered. Also, I couldn't touch it or be guaranteed that the colours shown on my screen would be the same in real life.

Just then, serendipity happened! A lady introduced herself to the double knitting group I belong to, so I greeted her. It turns out, we have a lot in common - she's super nice AND she's an accomplished spinner AND the timing couldn't have been more perfect! She's obsessed just like me too! It also turns out, she has a blog showing the most glorious fibres that taunted and titilated... they drew me deeper in as I looked at photo after photo of fleeces that she's magically transformed into locks of soft flowing colours. Then to top it off, she posted pictures of spindles - and her new spinning wheel! The icing on the cake was beholding the awe inspiring gorgeous skeins that just cried out to be payed attention to! I was done for. My growing obsession had grown, ripened and was now ready for harvest. Yes, it's all June's fault.

Now, I was totally compelled to find some fleece and learn to spin. In my search I discovered there's a fibre farm not five minutes down the road from me! It's called "joybilee farm" and I read through their website. I told my new fibre-friend about it and with her enabling encouragement, I payed the farm a visit. I had a wonderful time there and was so impressed with all the choices they had... silks, kid mohairs, french rabbit, llama and a variety of sheep and lamb wools. They raise the animals, and the organic materials they use to dye the fibres too! You can get fleeces in the grease or finished gorgeous yarns that they process in their own mill. Heaven!

Hours later, I came home with a 1.4kg Fine Romney fleece and an Ashford spindle and I was ECSTATIC! Right away, I emailed my fibre-friend, I just couldn't contain my excitement. I got her nod of approval on my fleece "score" and was pretty proud. Then, here's the funny part, she told me my spindle is known in the spinning community as "a boat anchor". Ahhhh!!!! My first foible!
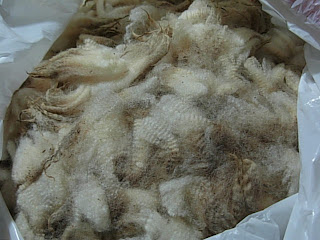


After my initial cringe, she further encouraged me by telling me that if I could spin on that spindle, it would probably make mastering a wheel that much easier. Ok, my sense of challenge is renewed. Thanks, June.

Well, that's how it all started and I aim to see this thing through. I want to make yarns as glorious as June's. I have a lot to learn - I know - and I think my first step will be learning various ways of cleaning my precious Romney fleece. Your pointers will be very appreciated! I hope you decide to follow me on my new journey. Go ahead and buy your first fleece - IT'S OK - I'm personally enabling you - and we'll figure this out together.